Lost Ark: The complete guide treasure map, hack questline, error emote, waiting for guests title and gold
Where the dark riddle spins the silver card - Limgrave. A fragment of the western map of the Treasure of the Derailed Train by K.S. Wealth Landmarks 2 Bonus Treasure Map Le Tresor Des Morts (Exclusive to Special or Deluxe Edition) Leindell, Royal Capital (1 map fragment).

Red Dead Redemption 2: Treasure maps, caches, and gold bars
This post will tell you where to look for eight treasures hidden in the huge game world of Red Dead Redemption 2 and point out the location of all killer clues.
You will see only small parts of the locations showing the treasure path on treasure maps. Maps can be found on your own or bought from treasure hunters that you can encounter in different parts of the world.
Jack Hall Gang Treasure Map
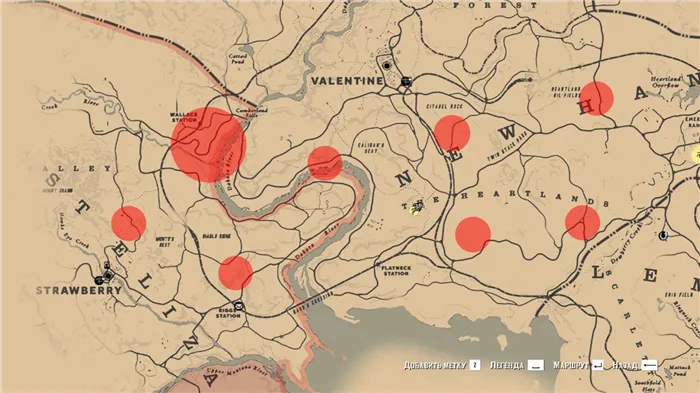
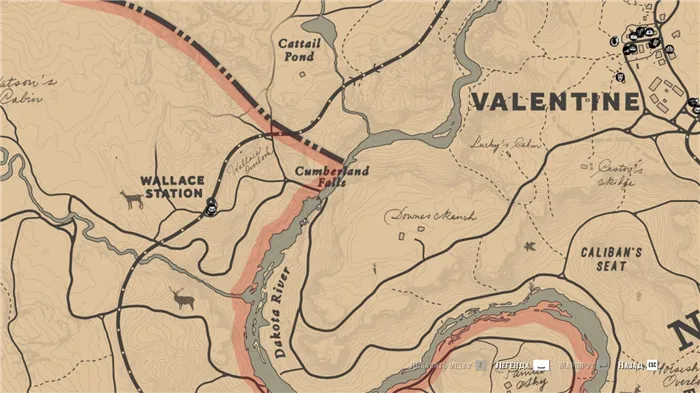
Jack Hall's Gang is a criminal gang of yesteryear that hid some of the loot somewhere in or near New Hanover. You can acquire the initial map from the treasure hunter Maxim, who can be met after starting the second chapter near Flatneck Station. He will offer a card for $5. You can refuse and kill the man, then take her from the dead man's body. If you ignored it and did not buy a card from Maximo, you can do it later.
So, the first card can be received from Maximo. Look for it on a ridge overlooking the river northwest of Flatneck Station and north of Bard's Crossing. Initially, Maximo will ask for $10, but the price will be reduced to five if you refuse.
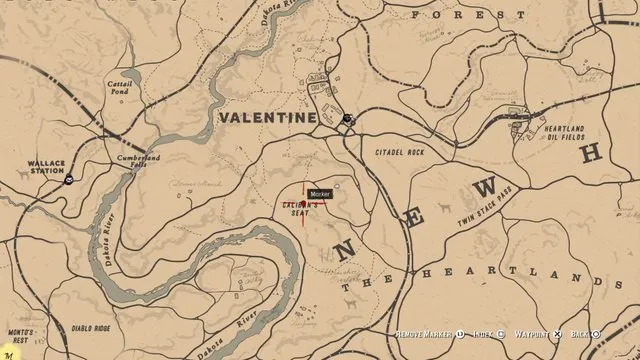
Climb the hill to the east to reach the very top. Follow the path in the rocks to the top. Move along the ledge, jumping over gaps and climbing over ledges, until you reach a large white granite boulder with a small hole. Inside it, you will find the second treasure map. The map will show Caliban's Seat, a unique mountain range south of Valentine.
The first map leads to the cache with the second treasure map of Jack Hall's gang. On it, you will find a new location, Cotorra Springs. It is located east of the dividing line between the adjacent letters A and R in the inscription AMBARINO on the map (and to the south of the inscription itself). This area is also home to the legendary wolf, so be careful.
Travel to the western part of the Springs territory, where you will find a small circle of several rock formations. The cache with the treasure map is in the center stack of stones inside the circle.

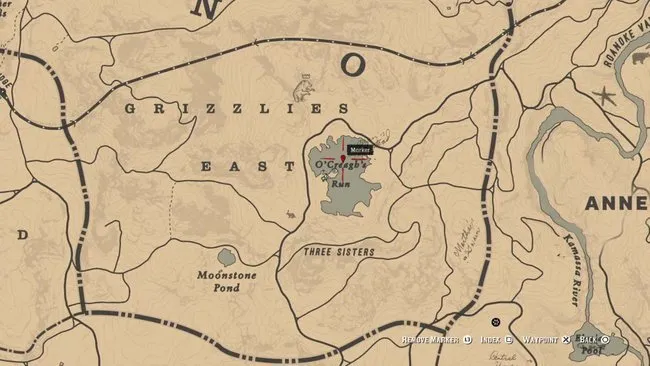
This map leads to O'Creagh's Run, north of the Three Sisters in the Grizzlies East region of Ambarino territory. To get there, head north from Emerald Ranch until you get to the hills. On a small island with rocks in the middle of the lake, under one of the stones, you can find Jack Hall's treasure - two gold bars.
The Last Niffler (100 Gold)
Route: King's Landing (Northern Bern), Treasure Island 2 times (second in a day).
After examining the statue and accepting the task "The Last Niffler," we set off in search of the creator of an unusual sculpture. It is located right here in King's Landing.
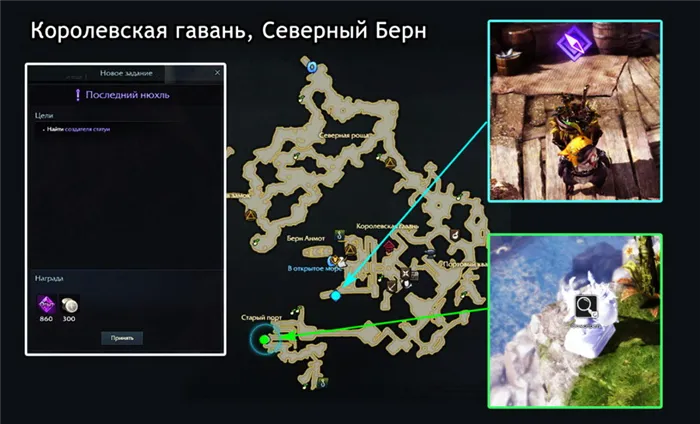
After the conversation, we are sent to Treasure Island.
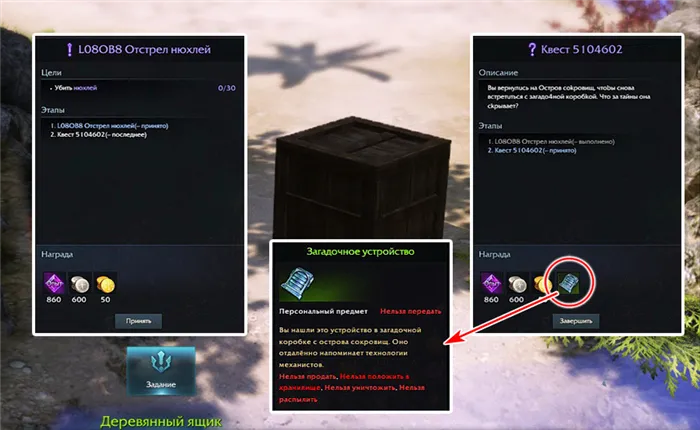
Immediately after entering, the task will be completed (it will just need to be "completed" in the task list), and the next, consisting of two parts, "L08OB8 Sniffer Shooting" and "Quest 5104602", can be taken from a wooden box nearby.
The first one will require you to kill 30 sniffers. This is easy to do alone, taking part in local events and attacking moles "running out of their holes." You can finish off the remnants after the battle with King Dooka (he is not needed for the task).
After returning to the box and turning in the quest, you will receive an invitation to come tomorrow for the second task.
But already, on the same day, you can take the task from the same box again (talk to him a second time) and kill 30 sniffers again for the same entrance to the island. You will receive 50 gold and "Mysterious Device" for both tasks - an item that starts the next stage of the "Hack Lost Ark" line.
"Hack Lost Ark" (600 gold)
Route: Stern (Bottom), the island "Secret Base X-301", Lower Rizhenki (Shuvyord), Glacial Gorge (Shuvyord), again the island "Secret Base X-301".
Marks on the map appear as soon as you get to the desired location.
Stern
We take the quest from the "Mysterious Device" and go to the "Bottom" of Stern to show it to a brilliant boy named Shield.
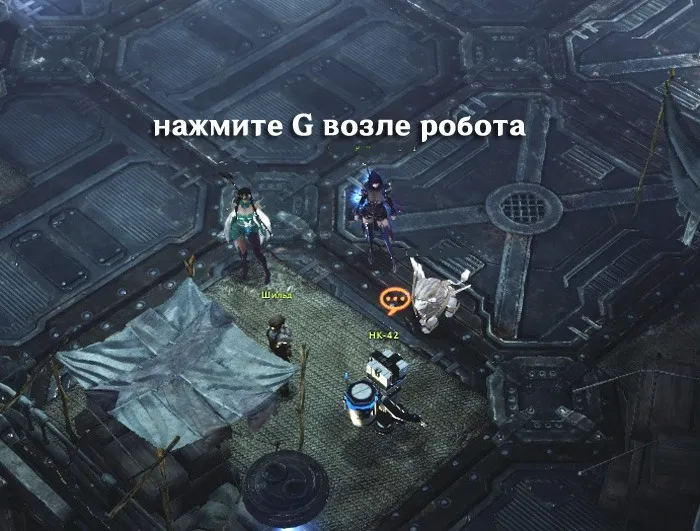
Shield asks to buy an ingot from the merchant Lexa, standing nearby. He undertakes to fix the device with the help of a personal repair robot. But you don't need to go anywhere. Just interact with the robot with the G key (the robot is highlighted as an active object).
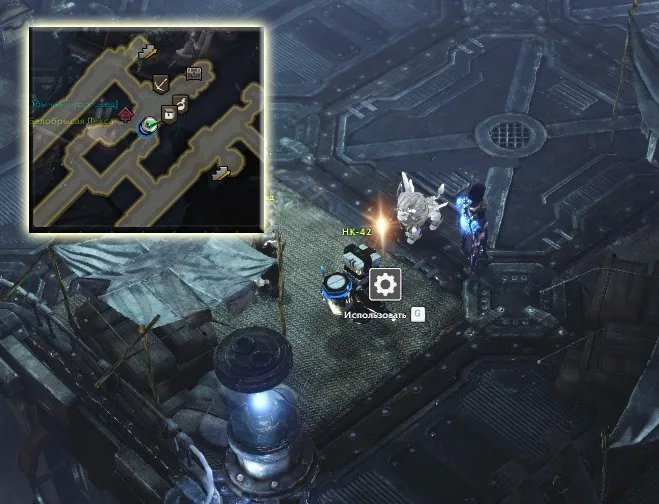
Then a dialogue bubble with three dots will appear above the robot. Again, try to interact with him with the G key. The robot breaks at the ends ...
We speak with Shield, once again inspect the "Mysterious Device" (F5) and sail to the island "Secret Base X-301".
Secret base X-301
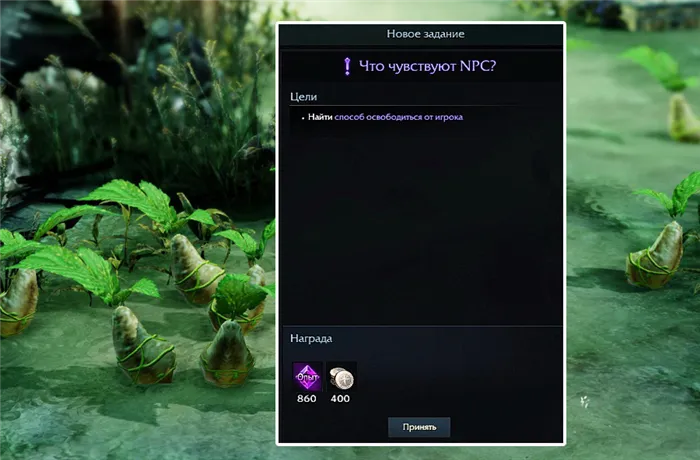
Near the entrance is tip.name.npc_townsfolk_51150, from which, after a tragic monologue, you need to complete the task and take a new one: "How do the NPCs feel?". Quest markers are on the map.
Talk to the traveling merchants and then break some crates nearby and collect six mokoko.
Schuvjord and the first story instance
After that, we head to Nizhnie Rizhenki (Shuvyord) to put the collected mokoko in their places and complete the task at the local postman Elongar.
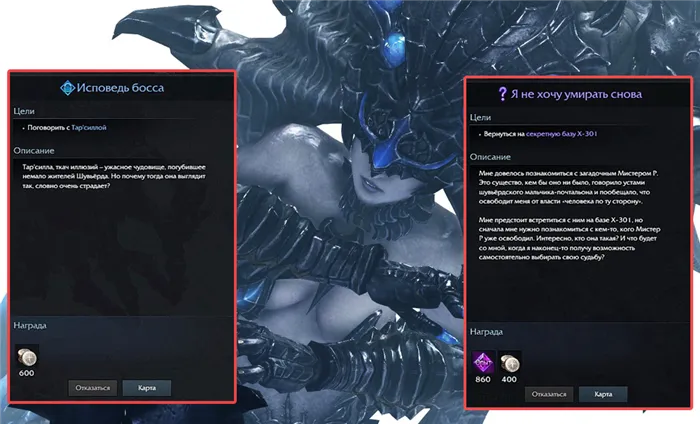
Through him, the mysterious Mr. R. will contact us and send us on another mission: "I don't want to die again." This time in the Schuvjord Glacier Gorge. There you will need to decompose the remaining mokoko seeds.
You will need to perform the Song of Resonance and then sequentially use emotions /flirt, /threat, and /sit down (follow the quest tasks). Then activate the Mysterious Device (F5). Along with the latter, you will find a crumpled note from Mr. R. Tar'silla.
A small solo dungeon awaits you with the quest "Confessions of the Boss," where you can get to know Tar'silla better (and finally examine her) and communicate with the unfortunate arachnid, tired of dying for the sake of a simple mark in the Seeker's journal and self-aware.
You have to brutally "zero" it to the latest stable version using the same "Mysterious Device" and kill it again...
Schuvjord and the first story instance
After that, we head to Nizhnie Rizhenki (Shuvyord) to put the collected mokoko in their places and complete the task at the local postman Elongar.
Through him, the mysterious Mr. R. will contact us and send us on another mission: "I don't want to die again." This time in the Schuvjord Glacier Gorge. There you will need to decompose the remaining mokoko seeds.
You will need to perform the Song of Resonance and then sequentially use emotions /flirt, /threat, and /sit down (follow the quest tasks). Then activate the Mysterious Device (F5). Along with the latter, you will find a crumpled note from Mr. R. Tar'silla.
A small solo dungeon awaits you with the quest "Confessions of the Boss," where you can get to know Tar'silla better (and finally examine her) and communicate with the unfortunate arachnid, tired of dying for the sake of a simple mark in the Seeker's journal and self-aware.
You have to brutally "zero" it to the latest stable version using the same "Mysterious Device" and kill it again...
X-301 secret base and second story instance
We return to the X-301 Secret Base to the same tip.name.npc_townsfolk_51150. Wait... The number has changed! It's already tip.name.npc_townsfolk_51151. We complete the task "I do not want to die again" and accept the following: "que.5104105.title".
We are looking for Mr. R. on the island (the mark is on the map) and find the "Remains tip.name.npc_townsfolk_51150". The player is then thrown into Zion🙂
All map fragments in Elden Ring and roadside obelisks guide where to find
Map Fragments in Elden Ring is a game add-on that enables you to activate unique points and fill in the "gaps" on the map.
It will take time to enjoy the holistic world of Interearth, even considering that the player will know and understand which direction to move to find the coveted relic or meet the most dangerous boss. And only roadside obelisks will reduce senseless wandering by revealing certain areas on the map and providing important information about nearby locations and possible attractions.
Thus, map fragments become one of the first things to focus on the search for. The only catch is that their exact location is a mystery.
Fortunately for many, the guide below will dispel the mystery of how to open the entire map in Elden Ring, covered with numerous secrets, and will allow you to deal with one of the most difficult mechanics of the game in no time.
Where to find all map fragments in Elden Ring?
Map fragments in Elden Ring are found on roadside obelisks, mostly stone pillars. They are very easy to distinguish from other monuments of marble objects due to the brilliant golden outline framing the engraving. Unlike most other landmarks, obelisks become visible on empty parts of the map as soon as the character passes or comes close to them.
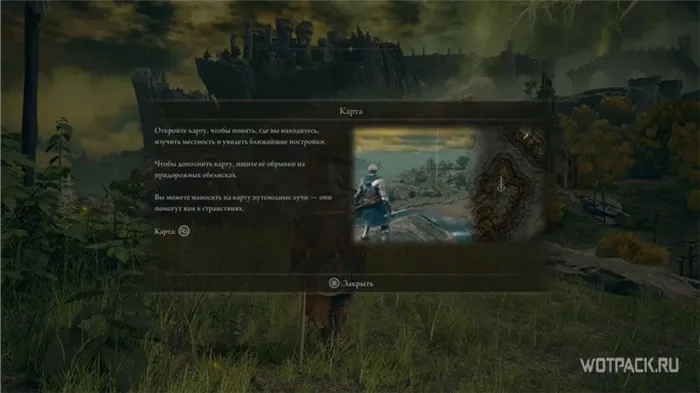
However, the path to the coveted roadside obelisks is only in some minor cases devoid of dangers. Even though a certain part of the gilded stone towers stands in an open area, at times, to discover and activate a particular area, you will have to go through ruins, caves, tunnels, and other unexplored intricate passages.
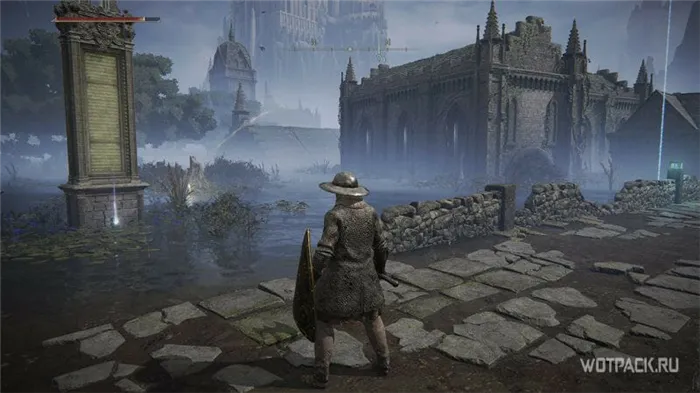
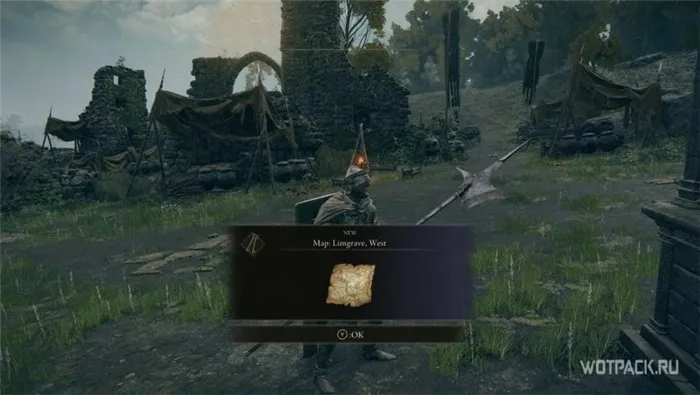
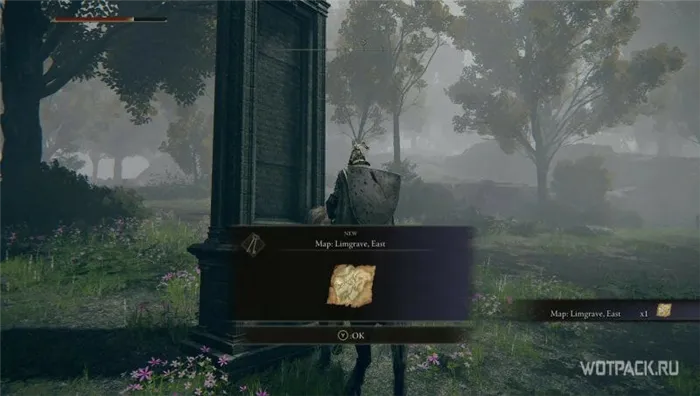
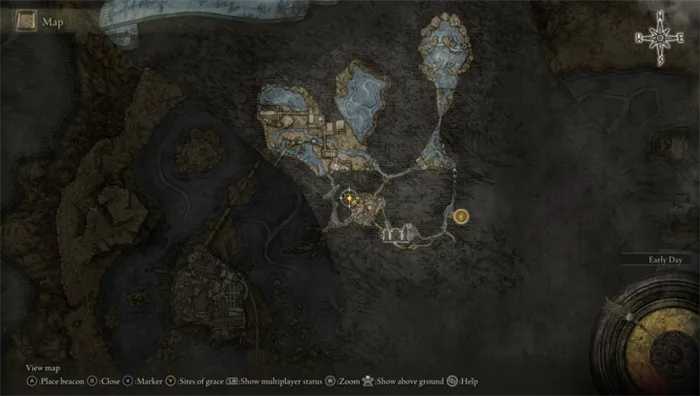
Limgrave (2 map fragments)

Limgrave's starting area has two map tiles. The West Fragment is in the central part of the Gate front Ruins at the main gate of the location - it's a short drive up the road north of Stormveil Castle.
Be attentive to the enemy soldier who settled in this territory. If he notices the main character, he will warn the entire camp about the presence of the enemy.
The eastern patch of Limgrave, in turn, is located further, not far from the Mistveil forest. To reach the coveted fragment, follow the road east to the ruins, and at the fork, take the road that curves north. After that, turn east again until you reach the valley and cut off along the path leading to the forest.
To avoid getting lost, carefully follow the map - as soon as a scrap marker appears on it, head towards it.
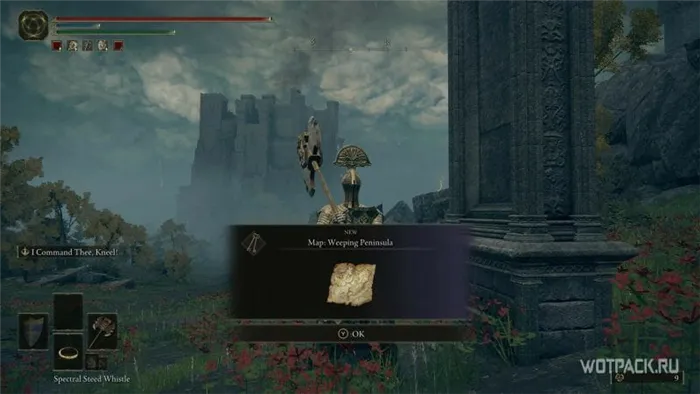
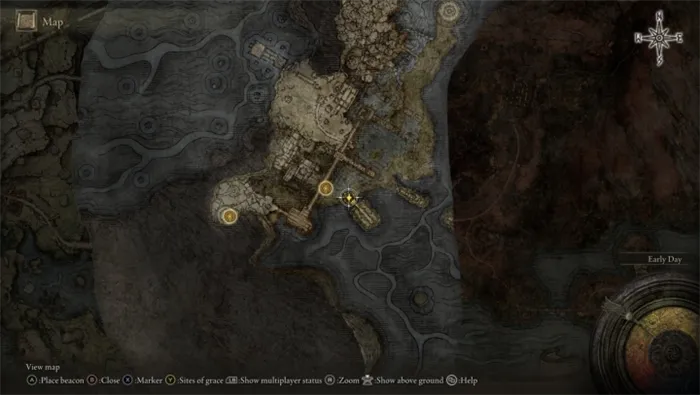
Weeping Peninsula (1 map fragment)
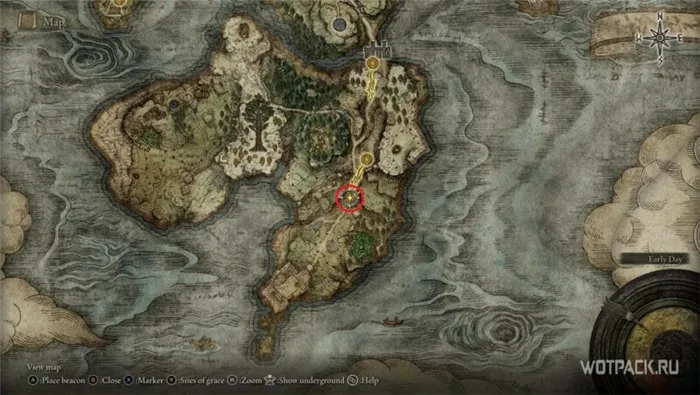
The Weeping Peninsula is a small area in the southern part of Limgrave. To activate the existing map fragment in this area, head to Morne Castle along the south road.
It is almost impossible to miss it: the high monument will be an excellent reference point in such a difficult test. However, be careful, as a huge Golem wanders near the castle. If an enemy is detected, it will begin shelling the enemy from afar.
Liurnia (3 map fragments)
Leaving behind the castle of Stormveil, the first thing that opens the eyes of the protagonist is the view of Lake Liurnia.
"At the top, there will be a path leading down between two high cliffs. Follow it to the mountain below and turn left. Follow the ledge and follow the thin ramp going up (ahead). Crouch to get further."
K.s. Jack Hall Gangs 3 ($1000)
The last map will take us to O'Creagb's Run.

To find the cache, you must examine the stone. It would be best to swim on a small island with a huge tree. It is advisable to have 7-8 levels of endurance to swim to it. Otherwise, you will drown.

K.s. "Great Expectations" 1
You need to find a treasure hunter and take it from him to get the first card. The appearance of the NPC is random, but if you get close enough, a white area of \u200b\u200ba random event will appear on the map. Usually, a hunter stands on the edge of a cliff, holds a map in his hands, and mutters something under his breath. If you killed this character, the card could be found at the buyer of stolen goods. Shown below are the approximate spawn locations for the treasure hunter.
The first part of the map will take us to Cumberland Fall. It would be best to go along the right bank to the waterfall and then the log behind it. There will be a cache in the rock with 5 dollars and the next card.

"The first one will require you to kill 30 sniffers. This is easy to do alone, taking part in local events and attacking moles "running out of their holes." You can finish off the remnants after the battle with King Dooka (he is not needed for the task)."
How to get a card from an item and bind it to an account?
Only Boss and Elite Monster Cards can be removed from items.
To do this, right-click on an item with an installed map while holding down the SHIFT key.
Inside the interface that opens, click on the "-" icon.
Pay 500 reais for this action (according to the current exchange rate - about 25-26 million gold).
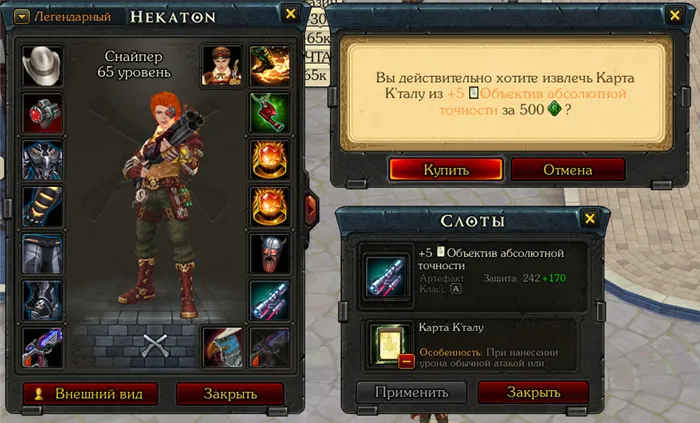
This procedure is interesting in that you not only return the card to your inventory but also link the item from which it was extracted to your account. This means that even if the item was personal, it could now be used by any of your other characters on that account.
All other cards cannot be extracted from items - only burned. You drag the new map right on top of the old one through the map installation interface. After confirming the operation, the old card will be destroyed, and a new one will take its place.
How Elemental Cards Work (Elemental System)?
There are six elements in Royal Quest + neutral.
- Fire - increased damage to earth creatures.
- Water - increased damage against fire creatures.
- Air - increased damage to water creatures.
- Earth - increased damage to air creatures.
- Poison - does not deal increased damage to other elements.
- Chaos - Deals slightly increased damage to all other elements.
- Neutral is the absence of any element.
What does it mean? Each element has a corresponding card that can be inserted into the weapon and only one copy. Each element card imbues a weapon with that element and increases the damage dealt by that element by 9% for one-handed weapons and 12% for two-handed weapons.
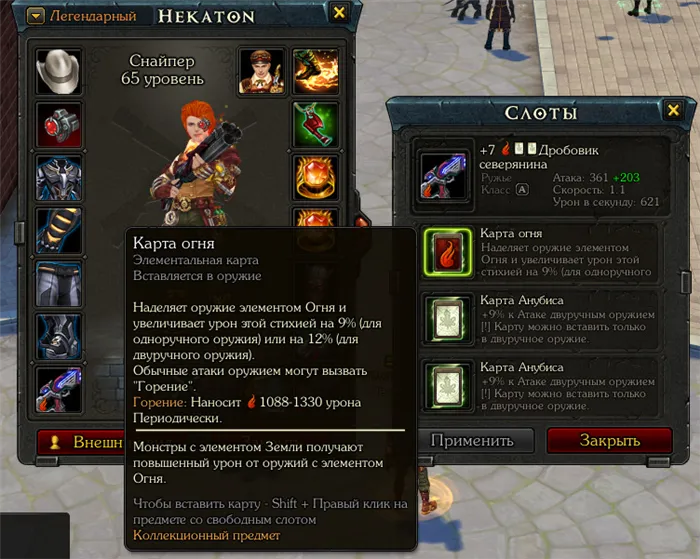
It is important not to confuse "increased elemental damage on another element" and a bonus of 9-12% damage from the same card - these are completely different things.
Each monster in Royal Quest has its element (Fire, Earth, Chaos, and so on) or is neutral. When we say that "The Fire Card deals increased damage to earth creatures, "we mean that the monsters of the Earth will take 10-30% more damage when attacked by a weapon with a Fire Card since the weapon was endowed with the element of Fire, which is a strong element against the Earth.
The damage bonus depends on the monster's element level (1-3). If we start to beat the monster of the Earth with the same element of the Earth, then the damage, on the contrary, will decrease. According to the latest information, each element level increases the damage against it with the counter element by approximately 10%, starting from the 20% corresponding to the 1st level. Fire damage against level 2 Earth monsters will be increased by approximately 30%, and against Level 3 Earth monsters by 40%. These dependencies can be viewed in a special table on WIKI Royal Quest.
When we say that "The Fire Card imbues a weapon with the element of fire and increases the damage dealt by this element by 9-12% ", we mean that now all attacks from this weapon will be "fire" (except for some skills that themselves I have an element myself), and their damage against any element, including neutral monsters and players, will be increased by 9-12%. This 9 - 12 % will be displayed in the Advanced → Elemental Damage tab in the character options window.
However, if a character's skill already has a default element, it will not be possible to change it with the card. For example, a Sniper Mine will always deal Fire damage, no matter what card is inserted into the weapon. At the same time, if a Fire Card (of the corresponding element) is installed in the weapon, the damage from the mine will be increased by 12%. For this reason, Assassins most often prefer the element of Poison, Warlocks prefer Chaos, and Snipers prefer Fire.

You can additionally increase elemental damage with the help of some equipment items. For example, Rings of Flame increase fire damage by 3%, and if you apply a red Seal of Fire on them, then an additional 8%. At the same time, the upper bonuses (the rings themselves) are added to the bonus from the element card, and the lower bonuses (seals) are multiplied. Because of this, as a result, the elemental damage is not 134, but as much as 138%.
"After the hole, we move along the right tunnel to the cliff (on the way, you can rob a small camp and pick up a large bag of jewelry). Having reached the cliff, turn left, reach the edge and jump off. Be careful. There is a huge gap behind you. When you run in the incorrect path, you will die instantly."
Fragment of the map of the river Ainsel
The Ainsel River is an underground area adjacent to Liurnia of the Lake, and it also has its Map Fragment. You may obtain him in a large pillared building in the southwestern part of your area. The huge monster on top of the building will continuously rain down projectiles. The zombie-like enemies are dangerous, so we recommend running into the building as quickly as possible to get the Map Fragment.
Fragment of the map of the river Siofra
The underground zone of the Siofra River adjoins East Limgrave, although its enemies are much more dangerous than those you will find on the surface. Luckily, you won't have to deal with many of these enemies when you collect the map fragment, located in the southeast part of the area next to the massive stairs.
That's all, map fragments that we could find in Elden Ring. Read how to increase maximum health or how to restore health, as well as where to find a forge.


Comments
Post a Comment